So..anyone who knows me and my work, knows I have no qualms about adding paint to already stitched pieces or stitched areas. I learned a long time ago, that if you don't like the way a stitch or even an entire finished piece looks...wrong color, not enough depth, etc...just add a bit of watered down acrylic paint! Or pastel (artist's chalk) pigment! Or watercolor! Or colored pencil! No pain, no gain, ya know!
This last year, I added some beautiful and fun ribbons to my wholesale line, which is distributed by Sundance Designs. These are not the silk ribbons that have been seen in the needlework market for a long time now. I LOVE silk ribbons and love the beauty and ease they enable for adding spectacular effects on a stitched piece of needlework. So, when I saw these ribbons that were being used in the clothing market, I was intrigued and wanted to give them a try on canvas.
YAY!! They worked out fabulously well, and I am so enjoying them. I now have 3 types of ribbon: Stitchy Ribbon, which is a 5/8" wide stretchy elastic with a satin finish; Glitzy Ribbon, which is 3/8" and has a glitter finish which does not rub off!; and Retro Ribbon, a 1/2" wide textured rayon ribbon that is quite thin so it can be used like any silk ribbon! They all come in lots of colors and I'm still experimenting with how to use them.
Recently, I decided to tie dye some of the Stitchy Ribbon..to see what would happen. Well, what happened was AMAZING! My color vibe, located in my brain, flipped into overload and high gear and have been dyeing and stitching for the last 3 days! This is a very HAPPY experiment and I'm definitely marketing these at the Dallas Market next month! There are not enough hours in the day for me to try out all my ideas with this painted ribbon, but can I just say that I have only nicked the tip of this iceburg? That would be the beautiful crystal clear moutain of white ice that turns turquoise deepening to sapphire and deep purple under the salty green ice cold waters!
Some people on Facebook have been asking how to use this ribbon. The methods for all the types of ribbon is the same, so I'll give you a little tutorial. But first, a word about these painted ribbons in particular---they may or may not be colorfast. I'm not going to test them. Be warned! And that said, I do not recommend using them if you wet block your needlepoint or plan on washing or getting it wet in any way. Yeah, I know....WHO does that these days? Well, there are some out there who do, just say'n....
To use my ribbons you need:
1. A nicely tapered wooden laying tool.
2. A size 16 Tapestry needle.
3. A bottle of Fray Check
4. Really nice sharp scissors that cut well.
5. A sewing needle.
6. An active imagination!
For Stitchy Ribbons, Painted Ribbons, and Glitzy Ribbons
Step one
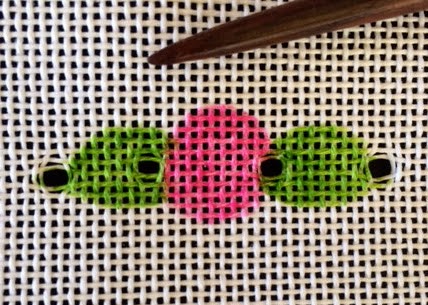
Enlarge a canvas hole by gently twisting the tip of the wooden laying tool into the hole, going deeper and deeper. Hold the tool straight up and down and don't twist side to side. Make a 'larger than you have ever made hole'! (The tension between wood and canvas fiber reduces the possibility of a canvas thread breaking. But even if one breaks, no worries!! I'm serious! It will not be a problem because it will not show when the fat ribbon is inserted!) The samples below are on 18 mesh canvas.
NOTE: Step one is only necessary if you want to insert the ribbon into the canvas. Ribbon can also be worked entirely on the surface, so you will have to decide if this step is crucial or not, for what you are trying to achieve. Below is a photo of a flower that is being created entirely on the surface. I attached the end of the cut ribbon (which I folded in half lengthwise) with a few anchoring stitches using 1 ply floss.
Step two
If you want to bring the ribbon up through a hole...
Insert just the TIP of a cut end of ribbon into a size 16 Tapestry needle. You will either plunge the ribbon into the hole, or bring it up from the back of the canvas, leaving a short tail on the back, in either case. No knot is needed. The width of the ribbon will keep it in the canvas. IF YOU ARE HAVING TROUBLE bringing the ribbon through a hole, the hole is either not large enough or you have too much ribbon in the eye of the needle, or BOTH. It will emerge through the hole easily if you have done as I described.
This photo illustrates how I made leaves on one particular canvas. The ribbon was essentially a long straight stitch! I further embellished the ribbon with other stitches later, to create veins and add other interests.
NOTE: If you are using Retro Ribbon, you do not need to enlarge the
canvas hole very much, if at all. You can also put a knot on the end,
as you would with any silk ribbon. Use a size 22 or larger tapestry needle for use with Retro Ribbon unless you are gathering it. In that case, you would use a sewing needle.
Step three
When you make flowers, use a sharp sewing needle with 1 ply floss to match the ribbon. You will be creating gathers by making running stitches down the center of the ribbon. Make about 5-6 small running stitches, gather the ribbon up and then take an anchoring stitch into the canvas. Come back up into the ribbon and repeat, circling around until the flower is the desired fullness.
Here is a flower being created with Stitchy Ribbon~
I will either plunge the end into a canvas hole, or perhaps, just tuck the end under and stitch it to the canvas.
Here is a flower being created with Glitzy Ribbon and a sewing needle. It is not being gathered, but the ribbon is brought up through holes and plunged down into holes for each petal, winding around from a central starting point. The sewing needle and floss hold the petals in place on the canvas with a few well placed tiny stitches. Be aware that you can make the ribbon hold any shape with a tuck here and there with a sewing needle and thread.
Finally, here is the Ranuculus, created from the Painted Ribbon. I very slightly gathered the ribbon down the center of the wrong side, keeping it folded in half so the satin side displayed. The gathers allowed it to go around the curves, but I kept it basically flat as I encircled the round shape with closely placed rows of the folded ribbon, open edges on top.
A few other tips:
Fray Check will become a useful tool in your needlework bag 'o tricks! I apply it to all cut surfaces of Glitzy Ribbon. Glitzy Ribbon, though a narrow ribbon, is thick enough from which to cut shapes for appliqueing to the canvas surface. Fray Check will keep the cut shapes intact. I attach all cut shapes with a sharp sewing needle and 1 ply matching floss.
The individual petals of this little flower were made with Glitzy Ribbon. The ends of each petal were plunged into the canvas at the center. The rounded cut edges had Fray Check applied.
This bird's front wing was created with two Glitzy Ribbon that emerged from canvas holes. The rear one was a simple straight stitch. The forward ribbon was a 'slightly gathered' straight stitch.
One more word about Fray Check. You can cut Stitchy Ribbon down the center seam to create two ribbons of smaller width. Just apply the Fray Check on all cut edges and let dry before using.
Step Four
Get out #6 from the materials list. Keep it out!
Now experiment! Experiment! Become familiar with how these ribbons feel, how they look, and think about how you might use them. Take a look at your canvas stash and question if you might apply any of these ribbons/ideas on your canvases. Then DO IT!! Remember: no guts, no glory! And remember too, that using ribbons will make you feel powerful and colorful...a good thing to be!


