I don't know about you, but I'm ready for some springtime cheer! I'm ready to get outside and smell the flowers, hear the birds, dig in the dirt, and eat some new asparagus! I'm also ready for a new stitching project!
I am working on a proposal now for the San Diego chapter of ANG, but I can't show it, of course. Rather, I thought I would share a stitching project of a different sort. You might find this project strange too, but if you want some fun...and diversion...here you go!
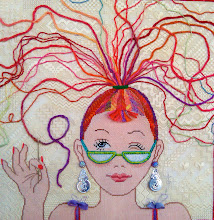
Go through your magazines and pull out images that appeal to you. I particularly like flora and fauna, but other images like that dress form or the little cakes sparked my imagination.

Next, select your sharpest embroidery needles to accommodate different sized threads and fibers from your stash. You need a sharp needle, not a tapestry needle, because you will be piercing through the paper and fabric layers. With a finger on top of the spot where you want to stitch, place the needle underneath the image with your other hand, and begin to slowly poke through to the top, feeling your upper finger for placement. (Wow..does that make sense? I hope so!) If you make a mistake in placement, no worries...it will leave a little hole, but who cares? Just keep stitching!
You can see what I have done in the following images. I used silk ribbons, floss, boucle, and any thread that looked interesting. I even added seed beads for extra embellishment. Often, only one ply of floss was needed and was very effective. After all the stitching has been completed, (you can add as much or as little as you like..no rules here!) trim the piece to the desired finished size. Frame it and enjoy. Enjoy too, all the comments you will receive from amazed and duly impressed viewers!


Have a HAPPY SPRING!


Three things, Barbara. First, we have had a ridiculous winter--biggest blizzards, lowest lows, ridiculous! Second, what's the ANG, and third, you lost me at "Next, select your sharpest embroidery needle."
ReplyDeleteThis looks like something I'd really like to do, but I just don't see it. Your examples are wonderful, of course.
Did you cut out the images individually in each larger image? completely lost...
I'd really like to do this.
Linda,
ReplyDelete1. We need to have a talk with Mother Nature!
2. ANG...American Needlepoint Guild.
3. Embroidery needles...come in various sizes. I guess saying 'sharpest' embroidery needle was a misnomer, in that all embroidery needles are sharp as opposed to tapestry needles, which are blunt. An embroidery needle has a long skinny eye, generally, and will accommodate more thread sizes than, say a hand quilting needle.
As I mentioned to you on facebook, this process is just like applique with fabric, only you are applying the steam a seam to paper magazine photos. After I put the steam a seam on the back of the photo, I cut it out, then adhere it to the fabric with an iron.
After the desired photos are adhered to the fabric, you are able to embroider the picture, but you have to 'feel' where to poke the needle up through the layers of paper and fabric.
Hope this helps. Let me know if you try this!
Great idea Barbara. Can't wait to try it myself. J
ReplyDeleteAnother clarification: The vase of flowers I show in this blog is ONE image that I took from a magazine. IF you were going to compile a collage of individual flowers, you would cut out each one and adhere to the fabric, arranging as you wish, just as if you were collaging on paper...only you are collaging on fabric and using double sided fusible web instead of glue. I feel like the more I explain, the more I might be confusing the issue.
ReplyDeleteOh, WOW, Barbara...what a fantastic technique. Makes me want to play, too! Thanks for sharing and giving us a peek of your process. Waving at you from California (with fingers crossed for your seminar entry), LAURA P.S.: LOVE your new blogspot format!!)
ReplyDeleteHi Barbara,
ReplyDeleteWow, I have missed your posts! This technique is really great and fairly easy! Thanks for the instructions on how to do it. I must practice some embroidery stitches. :( I have added it to my List of To Do's. :)
Hugs