
I'm in the midst of a new experiment this week. I've had thoughts about doing this, swirling in my head for several months, not knowing if I really wanted to tackle it or not. But, this week, I finally decided to take the plunge and delve in. After all, I would never know if it would work or not until I tried, right?
Painting a needlepoint canvas is not an easy endeavor. Among many factors, one has to make sure the paint consistency is right...thin, but still thick and on the creamy side. One has to have the right brushes...my most useful ones are worn out, short haired, with stiff stubby bristles, good for scrubbing the paint into the canvas. 'Scrubbing' is a technical term, in case you didn't realize! Of course, nice pointy round brushes of various sizes are equally important, and the type of bristle is key on those too. They can't be too soft or too stiff. And usually, my brushes have all the enamel paint chipped off the wood handles from sitting in my jar of rinse water a tad too long. That said, I think that the deteriorated condition of the paint handles is also an important component as well!
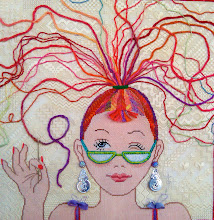
The experiment I took upon this week was to create paper masks for all the design motifs in my composition. My normal way of painting this piece, (and the way I did the original) is to paint the design elements, and then paint in the background, carefully painting around each element. This is painstakingly labor intensive, but necessary. The idea of using paper masks and then painting in the background over the masks is something I learned about from the quilting world. Quilt artists who paint fabric often use this technique, making masks out of freezer paper. I have long wondered if it would work on needlepoint canvas.
First, I had to trace the components onto tracing paper and rough cut them out. Next, I pinned them onto the matte side of freezer paper with tiny stainless quilting pins used for applique. Then came the cutting out of the shapes with scissors and an exacto knife for the more detailed and delicate parts. I spent several days tracing and cutting, tracing and cutting. It was a nice change of pace, actually.
Today, I laid out my canvas on top of a sheet, on my bedroom carpet. Then, I began to lay out all the masks in the proper positions. As I would lay a few down, I took my steam iron on a hot setting, and ironed the paper to the canvas. It adhered quite nicely, although I did have to go back over some of the pieces several times throughout the process. Finally, after I got all the pieces ironed down, I took the canvas to my easel and hung it up.

The carpenter's gift to me got me to thinking about purchasing a good airbrush system, and one day, I did! It was expensive for sure, but I can't tell you how thrilled I have been to use it in many instances. What previously would take me hours and hours can be accomplished in mere minutes. That doesn't take into account the prep time it takes for these 'mere minutes' to occur, but I will say again, that I have been utterly thrilled with the time saving it has afforded me.
The above photo of cut out masks represents about 3 days of cutting...that is, working on it for 3 days, but not the whole days. I think I can narrow it down to 2 if I stick to task. But back to the next step of my experiment....
Today, as I mentioned, I ironed on all the paper masks. By the time I finished, it was 5:00pm...the time I normally wind up my work and think about preparing supper for my husband and myself. But, I was at a crucial point...I wanted to get the painting done while the masks were adhered to the canvas. I was unsure how long they would stay put! So...I flipped the switch on my compressor, and pushed the trigger on my airbrush. By darn, I had the background painted by 5:03pm! Wahoo! I knew it would be fast, but not that fast! What a thrill indeed!


This is a wonderful technique. By the way, I loved this particular project. I'd use a little double-sided tape instead of pins to adhere the butcher paper to the canvas.
ReplyDeleteThanks for you comment Linda. This is one of my favorite designs too. For clarification....I only use pins to adhere the tracing paper shape to the freezer paper so it can be cut out. I forgot to mention that after the shape is cut out, I remove the pins and the tracing paper. The freezer paper is then ironed onto the canvas where it creates a tight bond acting as a mask. I will use small pieces of masking tape to block the pin holes next time, but I don't know any other way to transfer the outline of the shape onto the freezer paper other than using tracing paper.
ReplyDeleteI was also thinking about the length of time it took me to cut out and apply all the masks.....probably as much time as I would spend filling in the background by hand! That said, it was an interesting process, and very satisfying in the end! :-)
I used butcher paper to adhere pieces I was going to applique to a project background. I am currently working on another technoque without butcher paper (using an overlay)--so far, so good!
ReplyDeleteIf you would use the correct paint brushes, this wouldn't be necessary. I've been painting canvas since 1969, and insist on using only high quality sable brights in good condition- never have to "scrub." Inge Wooley (Creative Needle) and I used to make stencils to use as you are using the cut-outs, but for major mass production of elaborate Orientals. It was much neater and faster.
ReplyDeleteHi Judy,
ReplyDeleteI do have some great high quality brushes which I use for fine details. But I think a stubby scrub brush is essential for dry brush blending. I don't use such brushes for covering large areas of canvas, only for softening a line of shading. I am very pleased with the stencil masks...I found I was able to use them a second time, and possibly, they will work for a third time as well. Thanks for your comments. Good Materials are a must, and I probably didn't get that across.
It's great when a plan works out, isn't it!
ReplyDelete